The mid-2012 13 inch MacBook Pro 9,2 is a very solid piece of hardware. I used one as a daily driver for nearly seven years, and thoroughly enjoyed the experience. Of course I was then curious about how it would run with Linux. This post is a guide to installing a dual boot of elementary OS 6 on the machine, and some comments on why this might be the perfect hardware for you to run elementary.
In short, the installation is straightforward, and nearly everything works out of the box. The one exception is the wifi, for which you will need either an ethernet cable or a way to run internet through bluetooth to the laptop to get the wifi set up properly.
Everything else I tested worked fine out of the box. The camera, resuming from suspend, and keyboard shortcuts for adjusting screen brightness, keyboard back lighting, and sound all worked as expected out of the box. The installation steps I used follow.
Preliminaries
While this guide should more or less work for any MacBook Pro, the specific model in this guide is:
MacBook Pro (13 inch, Mid-2012)
Model Identifier: MacBookPro 9,2
Running macOS Catalina 10.15.7
MacOS Catalina is the latest OS supported on this device, but dual booting with other MacOS versions should be the same. Since purchasing the laptop, I did upgrade the RAM to 16GB and the hard drive to an SSD.
Step 1: Create partitions
The first step is to partition the drive to designate specific space to MacOS and elementary OS. This can be done using Apple’s Disk Utility application. In the view menu, change it from “Show Only Volumes” to “Show All Devices” and select the top-level drive with MacOS. Then click Partition. Apple may ask you if you just want to add a volume, but you want to add actual partitions, so click “Partition” to partition the device.
You then see a pie chart with a slider bar that allows you to resize partitions, and a “+” sign button to add partitions. I needed to create three partitions to be able to install eOS 6: a boot partition, a swap partition, and the main Linux partition.
First create a boot partition. This partition can be small, and I recommend making it 550MB. Set the format for this and all newly created partitions to “MS-DOS (FAT)”. Next, create a swap partition. Though this is optional, I would recommend creating it, and making it at least the size of the RAM of the machine. Given that I have an 16GB RAM machine, I made this partition 16GB. Finally, create the main partition which will determine how much space is available to Linux. I set this main partition size to 150GB, leaving the remaining space on my 500GB SSD for the MacOS side.
Sometimes, Disk Utility gave an error that “operation failed” after creating a partition, and yet the partition appeared and otherwise looked fine. It appears safe to ignore that error message, if it comes up.
Remember the sizes of the partitions that you created, as that will help identify them when doing the custom install of elementary.
Step 2: Create a bootable install drive
On MacOS, you can use a program called Etcher from Balena to create the bootable drive. Download Etcher, and then download the eOS 6 ISO file to your computer, and insert a USB drive. The ISO file for eOS 6 is about 2.6GB, so make sure you have a USB drive with at least that much space.
Open Etcher, select the ISO file, select the correct USB drive, and click “Flash!”
After flashing the drive is finished, you will see an error message that says “The disk you inserted was not readable by this computer.” It is safe to ignore this message.
Step 3: Install elementary OS
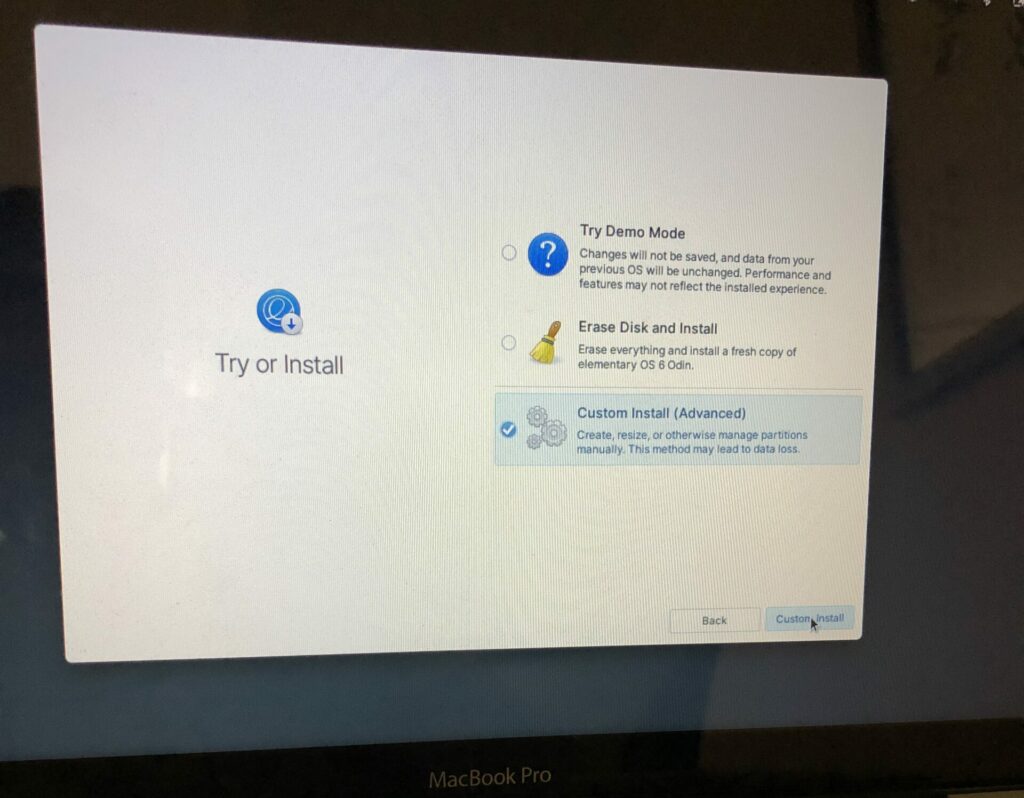
You are now ready to install eOS. Shut down the machine, insert the bootable USB drive, and hold the option key as you power on the machine. Choose an EFI Boot option, and you will be guided through elementary’s installer. Choose “Custom Install (Advanced)” so that you can designate the partitions yourself for dual-boot to work.
Then you are asked to designate the partitions for elementary OS to use. I ended up designating the following three partitions in the installer, based on the sizes chosen above:
/dev/sda3 150.0 GB format, use as root, ext4 format
/dev/sda5 549.5 MB /boot/efi
/dev/sda4 16.0 GB swap

With these partitions designated, you will be able to select “Erase and Install”. The rest of the installation process is smooth, and set up is straightforward.
At this point, I had a working installation of elementary OS 6. Everything except the wifi worked out of the box. Speakers and microphone work; volume, brightness, and keyboard backlight buttons all work as expected; and the trackpad feels great.
Troubleshooting: Enable wifi
Upon the fresh install, there will be no way to toggle wifi on or off or even see available wifi networks. This is because the proper drivers for the Broadcom wireless card are not available out of the box. And the solution is to either plug in an ethernet cable (or otherwise get access to the internet through a bluetooth adapter), and install the bcmwl-kernel-source driver through AppCenter. You will likely need to restart the machine after installing the bcmwl driver in order to be able to see the available wireless networks. With this driver, I was able to achieve expected download speeds of over 200 mbps.
To view the wifi card information on your machine, you can enter the command lspci in the Terminal. For this specific model, this command shows that the network controller is BCM4331 802.11a/b/g/n. This fix might work for other similar Broadcom chip models, but not guaranteed.
Dual Booting
The steps given above in this guide will result in a system that will boot by default into eOS. By holding down the option key during boot, you will get a boot menu where you can select either MacOS or eOS. This is a simple and perfectly fine way to dual boot, especially if you will be primarily using Linux.
However, if you’d like more control and customization, you can install the boot manager called The rEFInd Boot Manager. The boot manager will load automatically whenever the computer is turned on and detect all bootable systems available – no need to hold down the option key to choose the operating system. This configuration is probably most useful for people regularly using both MacOS and eOS on the machine.
Conclusion
Hopefully this guide was useful to revitalize a 2012 MacBook Pro with elementary OS 6. Given how smoothly elementary runs on this model of MBP, it may be one of the best Apple hardware models to use with elementary. And dual booting elementary on the machine is a great way to try out moving toward Linux. It’s a pleasure to be able to use such an elegant and open operating system on solid Apple hardware.
For a guide on the next step of installing software on elementary, see here.